|
||||||||||||||||||

|
I had had my heart set on a pair of Audio Note Kit03 loudspeakers for a while but my friend, who built the Tannoy cabinets, was no longer able to build the cabinets for me, as he no longer has workshop facilities (I'm OK with electronics and metalwork, but I'm no carpenter).
One of the important (and controversial) things about these speakers is that their cabinets are designed to resonate to a certain extent - acting like the body of a musical instrument such as a violin or acoustic guitar. This is something that is dismissed by many other speaker manufacturers who like to dampen cabinets as much as is physically possible, but is intrinsic to the design of all the AN/E range. Resonating in just the right way is dependant upon the design being strictly adhered to in respect of tolerances, brace placements, etc. when building the cabinets.
So, what were my options? I could buy some ready-made cabinets from AudioNote Kits Canada but the shipping cost to the UK may have been a little impractical. Alternatively, I could find someone to build them for me but I didn't feel too comfortable letting a complete stranger build them. For anyone reading this who lives in the U.S., I would look to AudioNote Kits for the cabinets - I know they are built to a high standard and use the recommended best material.
My Big Break
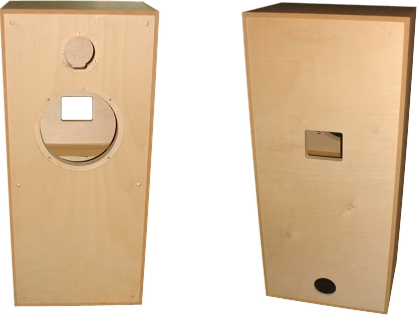
Well, I just happened to mention my dilemma to Peter Qvortrup (owner of Audio Note UK) in an e-mail of a completely different subject. He told me that he still had some factory made cabinets left over that were of the older design and unfinished. How could I resist?To fill you in on this, the latest cabinets from Audio Note use multi-ply Russian Birch for the entire outer cabinet shell. The older designs, however, used the Birch ply only for the front and rear; and have MDF sides, tops, and bottoms. So, my cabinets would not be of the absolutely latest design but they would be made to the very high tolerances that Audio Note's finished product speakers are made to. I have heard in the past that the front baffle is actually freeze-fitted (i.e. made to exact size, frozen so it shrinks, then fitted and allowed to expand into place - very tightly) although I have not yet been able to verify this.
What's more is that Peter's wife was to visit relatives who lived quite close to where I live that same weekend and would bring them along. Peter was also kind enough to fit the port tube into the cabinets before delivery. The T-nuts that are used to screw the drivers' fixing screws were also already fitted. What a break!
Getting a Good Finish
My next dilemma was how to give the cabinets an acceptable finish. The ideal solution would be to veneer the cabinets and then gloss-finish them. However, these were things that I knew very little of.Luck strikes again! I stumbled across a local antique furniture repairer and furniture maker called Mark Hopkins, via his website, who was willing to veneer them and finish them to a high gloss - he was only about 6 miles away. I went to see him and simply couldn't resist the temptation after seeing some of his work. I chose an African Satinwood from the many samples that he showed me. One of his finished pieces used the same wood on the front of its drawers and looked beautiful. Unfortunately, it was a little more expensive than hoped because he did not have any of that particular veneer wide enough for the depth of the speakers and would have to do a join. I saved some money by leaving the back of the speakers unfinished. It would take around 2 weeks to finish.
Two weeks later, the cabinets were ready to be picked up. Mark had French polished the speakers to a high sheen and they looked stunning under his workshop lights. So, the sides, fronts, and tops had been finished off. The bottoms and rear had been left as-is per my instructions - no need to apply an expensive finish to the parts I will never look at. I may paint, varnish, or stain the rear of the cabinet but, for now, they can stay as they are.
The finish was nothing less than spectacular. It is difficult to photograph not only because of its reflective-ness but also because one of the features of this kind of wood is that the grain appears to move around when you do - having a kind of holographic effect that simply won't show up in a picture.

I was instructed to let the cabinets stand in air for a week to 10 days to let the finish settle. This was a difficult time; having to look at two beautiful speaker cabinets that were empty and begging to be completed.
The name of the person who finished my cabinets is Mark Hopkins and I promised that I would display some of his work on my site as he only has a small site of his own that doesn't do him justice. So, click here to view some of Mark's other work and find out how to contact him (this will open a new window).
|
|