|
||||||||||||||||||
|
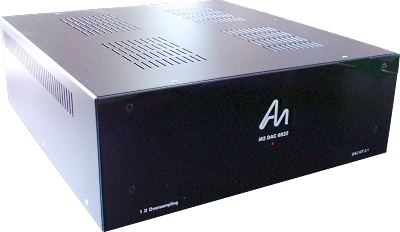
The following review is split into three separate parts. The first is an overview of the kit, the second is dedicated to the building of the kit; whereas the final part is dedicated to the resulting piece of hi-fi equipment and its performance as an audio reference.
| PART 1 - Overview |
| Introduction |
Then what do I hear? AudioNote Kits are to release a new DAC kit - the DAC Kit 2.1. The only finished product Audio Note DAC I have heard is the DAC 1.1 MkII Signature. I heard this DAC when I bought my TT-2 turntable and it was 'almost' on par with the demonstration TT-2 (Arm2/Io1/Step-up) - coming a very close second. The new DAC kit, however, on paper looks to be every bit as good, if not better, than that particular DAC - depending on which options and upgrades you go for. In fact, I would go as far as to say that with all upgrades that is should compete well with the production DAC 2.1. Unfortunately, however, I have no means to test out this theory.
| Filtering |
| Split Power Supplies |
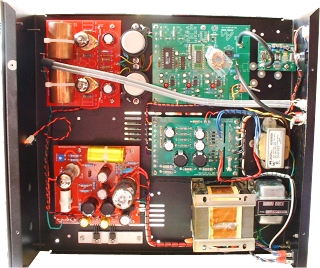
One is used to power the digital input board. This power supply is actually the one from the DAC Kit 1.1 that was used to power the entire unit (digital and analog). Here, it is simply dedicated to the digital side of things. This is useful for people who wish to upgrade their DAC Kit 1.1 up to the new kit's standard of course because they will be able to re-use this board. It consists of power supply board, mains switch, and mains transformer. Yes, the digital section has its own mains switch! I imagine this has been done for versatility where you can have power to either section to keep those precious Black Gates charged but still have the choice to save those valves at the same time.
The power supply used for the analog section is the M2 power supply that is also used in the Kit1 Phono Stage Signature that I built elsewhere on this site. It is, however, slightly modified to supply the correct DC voltages for the 6922 tubes that the DAC Kit 2.1 uses. This is taken directly from Audio Note's finished products line (from the M2 in fact - hence its name). It is a very high quality power supply that supplies HT and two DC heater supplies. It is transformer/choke based and uses valves for both rectification (6X5) and regulation (ECL82) of the HT supply. It uses its own dedicated mains transformer and choke.
That means that this kit sports two mains transformers, two power switches, two power supply boards, one large choke, and one mains input socket.
| Digital Input Options |
I also opted for the Signature Digital Board. This adds some Black Gates and an Audio Note Digital Input Transformer. Also known as a digital pulse transformer, these toroidal transformers are used to great effect on both the outputs of CD transports and the inputs of DAC's to reduce RF and HF interference etc. My Audio Note CDT-One transport uses one at its output.
Normally the digital board can be switched between RCA and XLR inputs. However, to allow input via USB the XLR connector has been removed so that its input space on the board can be used to connect the output of the USB board. Please note that USB is an optional extra so the XLR connector may stay in place on those kits ordered without the USB option - I don't know, you would have to ask AudioNote Kits to find out for sure. Unlike the DAC Kit 1.1 which has its switch and XLR connector directly on the back panel, the 2.1 does not (at least on this early version). The switch has been left on the board inside the chassis so that switching can only be done after removing the lid - I suppose because the majority of users would simply leave it switched one way or the other. However, because I wanted to experiment with both RCA and USB inputs, I decided to extend the switch to the back panel. Doing this is OK because the switch switches a relay by grounding or not grounding it so no actual signal passes through the switch itself.
The USB board (which is an optional extra) is actually a third-party board that is bought in from another manufacturer. It will be interesting to see (or rather hear) how good this is. However, I do have some reservations. I can't see myself using it a great deal simply because I use my computer for so many extreme tasks that make it struggle as it is without having to ensure perfect time related streaming. It may, however, be of extreme use to people who are planning to get dedicated media servers like the X-box 360, for example, who wish to transfer their CD collection onto hard disk etc. I'll just have to see.
| I/V Interfacing |
| Output Stage |
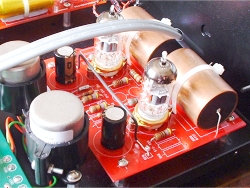
The analog board itself is point-to-point silver hard-wired. This was the only board available at time of ordering but I have been informed that a standard printed circuit board would be made available shortly for those who may find the hard-wired version too difficult to deal with. I prefer silver hard-wired boards myself as they will always yield the best performance but I do understand that some people may find them a little difficult to deal with.
The components on my version contain tantalum resistors, Black Gate capacitors, and Audio Note Copper foil coupling capacitors. Having so many Black Gates on board means that I probably won't hear this DAC at its best until it has been in use for a few hundred hours - thus is the nature of these wonderful components.
| About the DAC Kit 2.1 Range |
- Level A
- Level B
- Level B Signature
All versions (except the Level B Signature) can be upgraded with various individual upgrades (tantalum resistors, Black Gates, etc). There is also a Signature Digital board available (standard with he Level B) that adds some Black Gates and an Audio Note Digital Input Transformer.
All versions above Level A come with I/V transformers (level A uses a simple resistor base coupling method).
A USB add-on board is available for all versions that allow it to be interfaced to a personal computer.
I went for the Level B Signature plus USB option. Who knows, we may even see a Level C version in the future - who knows?
For more information and pricing, please visit the AudioNoteKits.com website.
| Ordering and Dispatch |
Suffice it to say that it took 6 days to arrive in the UK from his base in Canada. Everything was very well packed for the journey (as I have come to expect). No problems there.
| PART 2 - The Build |
| Overview |
|
I have documented the build separately on this site - a link to it can be found at the bottom of this page.
This is the fourth kit that I have built from Audio Note up to now (the third from AudioNote Kits Canada). Each time the quality of documentation has improved and the easier it has been to build the kits. This kit was no exception. I had one of the first kits to be released - certainly form the first batch. Brian, at AudioNote Kits, told me this and asked if I could report any problems. I found none to speak of, which isn't really good when you are writing a build review because you find yourself with very little to write about; but very good if you're just a builder! I would class the level of difficulty of the build comparable with the build of the Kit1 Phono Stage Signature (built elsewhere on this site). It was more difficult than the DAC Kit 1.1 but less difficult than the PQ Kit1 Signature SET Amplifier (also built elsewhere on this site). |
One of the reasons that I document my builds on this site is so that the individual can better judge whether they could, themselves, build such kits. I have helped quite a number of people who have never built kits before who have decided to try one of the kits that I have documented. They have all had different levels of technical competence - a couple had never used a soldering iron before. Suffice it to say that they have all, up to now, succeeded and are now very happy with their systems and themselves as 'building your own' really is a very satisfying thing - especially when you are building a product that will out-perform most of the pre-built products that you would otherwise have bought. I'm sure that many, if not all, of these people had a very big grin on their faces after finishing their projects.
| The Manual |
|
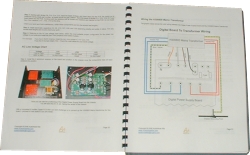
I found the manual to be very concise and to the point with plenty of helpful pictures. It takes you through the build from start to finish in simple steps with plenty of illustrations along the way.
I found the manual lacking only in one area - the analog board build. However, that is because I opted for the silver hard-wired version of that board. A normal, and somewhat simpler to build PCB version is also available (more on that later). The silver hard-wired board is mainly for experienced enthusiasts who are capable of wiring straight from the schematic. |
| The Analog Board Build |
|
The hardest part of the build was the analog board build. This is because I opted for the silver hard-wired board. There is little in the manual about how to go about building this - it just gives you a starting point and helpful tips on how to proceed. There is, however, a PCB version of the analog board available now that should make its build very simple because quite a small number of components are involved.
It was because of the lack of documentation in the manual about the silver hard-wiring that lead me to go into such detail on the analog board build page so as to make up for the manual to some extent and to help those who wish to build that particular version. I would imagine that the majority of builders would opt for the PCB version, but for those who don't, there are always my build pages to help them along.
Information Update: I have been informed that the hard-wired analog board has been dropped as a standard option. This is because many of the less experienced builders have had problems building it correctly and too long has been spent supporting them - making it non cost-effective. A new, high quality PCB board is now supplied as standard. The hard-wired option will still be available, however - but only by special request from the more experienced builders.
|
| The USB Interface |
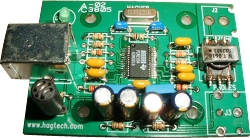
|
You may have noticed on my build pages that I also built the USB board. This was a little tricky because it is a small board with very small components and tiny tracks (I was using too large a bit on my soldering iron though). However, normally this board (if purchased with the kit) comes ready assembled. I simply wanted it a little faster so I asked for an unfinished board and built it myself.
The USB board's input socket fits through an existing slot in the back panel and the board itself rests on four metal pillars. The board is self-power (i.e. gets its power from the computer via the USB cable) so all that needs to be wired up is the connection between it and the digital conversion board. This also makes initial testing of the board very easy because you can connect it to the computer without having it in the chassis to make sure that the LED light comes on and that the conmputer recognises it correctly. |
| Modification |
|
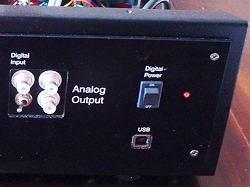
There was one personal modification that I made to the kit. This was to do with extending the digital source switch from inside the chassis to the back panel. It appears from a schematic of the digital board that no audio signal passes through this switch (it simply switches an earths a relay or doesn't), so I deemed it sonically safe to do so.
This then gave me the ability to switch between USB and S/PDIF. I did this because I was initially impressed by the quality of the sound via USB and wished to investigate further with direct comparisons etc. I used a spare hole under the Digital Input RCA to fit the switch into. |
| Conclusion |
I would recommend anyone who feels competent enough, to seriously consider building their own hi-fi equipment. I also hope that my build pages help you decide to follow suit and enter the world of roll-your-own hi-fi - it's highly satisfying and will also save you a fortune if you want to venture into the world of true high-end performance.
| PART 3 - Performance |
| First Impressions |
I already had a few select CD's to hand to perform my first listening tests.
The very first thing I noticed was the bass response. Not only was there more lower bass energy but the bass itself was much more controlled and detailed than ever before. Plucked acoustic bass, for example, was no longer just a bass sound - it had form and shape with natural decay.
The top end was now more effortless and extended than ever. It is not like simply turning up a treble control, however, because there is no harshness to it. The extension makes a huge difference to the amount of detail that I could now hear on familiar recordings that I thought I would never hear anything new from. I could now hear breathing, people in the background, movement; all kinds of things I had never heard before. This also gave a lot of 'air' and more sense of space to the music. The side effect, of course, is also being able to hear tape hiss in the original recordings (older analog recordings) and such things as organ keys being pressed, people moving in the background, etc. - but if that's how it was recorded then you should be able to hear it!
I would not be surprised if the extended upper end detail was down to the fact that no analog filtering was being performed.
Next up is separation. I am not just talking about separation between channels. I am talking about separation between instruments. I think that the excellent M2 power supply is allowing high-energy detail to come through without affecting other parts of the music - one of the virtues of a good, over-rated power supply. This allows low-level detail to be heard through other louder parts of the music - allowing you to much more easily follow individual instruments through a complex passage.
| Breaking-in |
With respect to burn-in, I intend to leave the digital circuitry switched on constantly but will switch the analog side of the DAC on and off as appropriate for listening sessions. I do, however, listen to music all day long during workdays as I currently work from home. Any references to hours on will therefore relate to analog time on whereas the digital circuitry will have been switched on longer than this.
| USB Interface Performance |
Setting-up and using the interface couldn't be easier. My computer (Dell PC running Windows XP Professional) instantly recognised it as a 'USB Audio DAC' without the need to install any drivers from disk. This then becomes the default output device for audio unless you are using an application that has allowed you to specify a particular device for its use. In my case, this meant that all audio output (except Skype and a few other communication programs) was directed to the DAC via the USB interface.
The one thing that remains a mystery to me is how exactly the computer determines output resolution and how to convert anything not directly compatible with the supported frequencies of the interface etc. Therefore, it was important that I use an application that would allow me to specify an output method that would take care of streaming a file at its correct sampling frequency and also allow me to target the USB interface specifically as the output device. So, for output, I used Foobar2000 - this allowed me to do just that.
My first choice of Kernel Streaming didn't work - but that is not the fault of the interface, as that option simply doesn't work on my machine for any device (don't know why). So, I configured it to output to the DAC using DirectSound 2.0 which worked fine.
So that I could do direct comparisons, I used EAC (Exact Audio Copy) to copy the tracks from various CD's that I wanted to use for the comparisons tests. I have heard that this is one of the very best of its kind, I have used it many times before, and it's free. I, of course, copied the tracks as uncompressed WAV files.
Now, having the switch fitted to the back panel of the DAC meant that I could easily switch between CD and USB. It also meant that I could start off a track on CD and the same track on PC at the same time and switch between them at about the same location.
When connecting up the USB interface, it is advisable to connect it to a USB socket in the computer directly (as opposed to connecting to a hub) so that it has to compete less with other devices (printers, etc) that may be connected. Also, make sure that the volume control for the USB Audio DAC is turned up to maximum so that the computer does not perform any bit manipulation to decrease volume. You can get to the volume control by double-clicking the speaker icon at the right of the taskbar - make sure you are looking at the properties of the 'USB Audio DAC'.
So, to the listening...
It was time to pit my computer against my CD transport.
I first thought that the comparison tests were going to be conclusive one way or the other. However, I discovered that I would have to listen a lot harder than I had anticipated. The great thing about these particular comparisons was that the levels, when switching between sources, were at exactly the same playback level (this is usually a problem when comparing other pieces of equipment side-by-side). Despite this, it was very difficult to come up with anything conclusive when switching between them. Perhaps it was the fact that I had to move my position to do so?
So, I decided to listen to an entire track at a time and then the same track using the 'other' method. I also decided to alternate which source to use first each time.
It was a very close run thing, which surprised me greatly. The computer seemed to have all the low level definition that the CD transport had and most of the midrange detail. Where it differed the most was at the top end; the transport had the edge; providing more overall presence.
Later, I decided to put a very large playlist together and have it playing in the background while I was working on my computer. Most of the time, this worked great but a couple of problems were encountered. Firstly, pop-up alerts that make a sound or message beeps do come through to the DAC. You may be able to configure things to not do this. Secondly, the music did cut-out for a second or two now and again when the computer decided it had heavy duty hard-disk work to do in the background - this was one of my fears all along but for the most part music was delivered reliably.
In conclusion, the transport delivered a more musically laid-back version of most of the source materials but it was a surprisingly close thing. Bearing in mind that the USB interface competes this closely with a reasonably expensive transport, it could be looked upon as a fantastic bargain.
I don't, however, think that Audio Note have anything to fear on this issue because I know that their latest version of my transport (the Mark 2) is capable of retrieving even more detail than my Mark 1 version - and then there are the models above them that leave mine standing. There is also the fact that a PC's hardware, in normal use, will always have to prioritise between its output devices, hard disk access priorities during use, streaming priorities etc. making it not the most ideal source for purist audiophile use.
| Compatibility |
I am happy to report that the DAC Kit 2.1 has a much lower output impedance of 1.3KOhms (about a fifth that of the 1.1). This makes it compatible with a huge range of components; both transistor and valve (tube) based.
| Conclusion |
So, if you want a true audiophile DAC and feel capable of building one (hopefully my build pages will give you a good idea of whether you would be up to the job - see link at the bottom of this page), then this DAC has to be seriously considered. You will probably save an awful lot of money too in comparison with buying a finished product of equivalent sonic performance.
Highly recommended.
Written by Paul Brookes
Published 22 September 2006
I am now up to 750 hours of analog board 'on' time. The only time the sound truly suffered in any way was in the 50-100 hour region. Then, the Lower midrange seemed to fall apart a little and bass got a little sloppy. Also, the upper frequencies (lower treble) became a little more typically aggressive (for digital) although the detail itself did not suffered.
After that initial 'glitch' the music began slowly solidify and work as a whole. That's one of the things I have noticed about Black Gates in the past - during burn-in, you tend to notice holes and emphasis on specific frequencies. A hole appears here and a certain band becomes over emphasised. In time however, these disappear and the music can no longer be described in these terms anymore because the music comes through as a whole. That is exactly what started to happen.
I have also very recently added my new Audio Note Kit03 speakers to the system. These have brought the system to a totally new level of performance and the DAC Kit 2.1 is more than capable of providing the extra detail that these speakers are capable of portraying. Their extra sensitivity also show up how quiet this DAC is.
| Turntable | Audio Note TT-2 |
| Arm | Audio Note Arm1 |
| Cartridge | Audio Note IQ2 |
| Phono Stage | Audio Note Kit1 Phono Stage Signature |
| Amplifier | Audio Note PQ Signature Kit1 |
| Interconnects | Audio Note AN-v |
| Speakers | Tannoy DC 386 - 15inch dual concentric in custom cabinets |
| Speaker Cable | Unknown silver multi-stranded |
| CD Transport | Audio Note CDT-One |
| DAC | Audio Note DAC Kit 2.1 Signature with USB interface |
| Links |
| Audio Note DAC Kit 2.1 Build Process |
|
|
